Monday, November 18, 2013

New Toys

I thought I'd write a quick post on some of the new tools I've acquired.  When I started I really only had the router, a circular saw and a drill.  Over the past year and a half I've purchased some power tools to open up more possibilities for future projects.

One of the most difficult things to do with just a router and circular saw is cross-cutting thin stock.  So my first purchase was a compound miter saw:


This made the trim work on the coat rack base much easier.

Next was a purchase I hadn't intended to make.  Unfortunately, my favorite tool, my router, broke mid way through building the coat rack.  I was unable to get it repaired so I decided to purchase a new one.


The new Bosch is great.  Pretty similar specs to my old Ryobi router but much more convenient for switching between hand held and table mounted operating.  It can also use 1/2" shank bits whereas the Ryobi only used 1/4" shank bits  Though I do like the plunge system of the Ryobi better and I preferred the Ryobi's trigger style power switch to the Bosch's toggle switch.

Then I made the big purchase.  The definitive wood working power tool, the table saw:


I had been eyeing used table saws for awhile, never really wanted to pull the trigger though.  Even used table saws are pricey.  Then my wife and I were at a tag sale and it just so happened the guy across the street was selling off his whole shop.  I was pretty happy with model, nothing too fancy but a step up from the bench top and contractor models, and of course within the price I wanted to spend.

I've already started working on a project to get familiar with the table saw operations which I'll post more on later this week.

Lastly was another purchase from the tag sale, a thickness planer.  I couldn't resist and the price was right.


I'm pretty excited about these last two purchases.  With the table saw and the thickness planer I can actually buy rough cut lumber from a lumbar yard instead of the pre-cut boards from Home Depot and the like.  This opens up a lot more options with hard wood.

Saturday, November 16, 2013

Knife Block

The next problem I needed to solve involved our kitchen knives.  We have a set of Calphalon Katana knives.  The knives were all purchased individually, we didn't get a set with a knife block.  While looking for a knife block I discovered, despite being great knives, they have one drawback.


If you look at the picture above you'll notice the shape of the handle blends into the blade.  There's not a clearly defined end of the handle and start of the blade.  This actually makes it difficult for these knives to cleanly fit into a traditional knife block.

Our first solution to this problem was the Kapoosh knife block.


This knife block is made up of tiny plastic "fibers" that can hold any shaped knife you have.  In the beginning this seemed to work well.  The concept solved the problem with the knives.  The biggest issue, however, was that we couldn't fit all of our knives in the block.

So I decided I wanted to try to make a custom knife block that would fit all of our knives perfectly.  My original idea was to make a traditional knife block but instead of typical flat slots for the blades to cut a more "triangular" slot so the knives would fit cleanly.  Take a look at the knife block that comes with the set of Katana knives today to see what I mean:


(Side note:  You can't buy this block on its own)

As I was trying to design this block I realized cutting those slots was going to be really challenging.  I would have to create some kind of jig and find a router bit with the proper cutting angle and what if different knives had different angles?  I ended up abandoning the idea and looking for something else.

Then I found an episode on the Wood Whisperer where Marc makes a knife block.  The key to the design was using bamboo skewers to hold the knives.  This is the same concept as the Kapoosh but using something readily available.  This was an amazing idea and exactly what I was looking for.  The episode was great and had a lot of useful info, but the plans still required tools I didn't have.  I also had my own ideas of how I wanted the knife block to look.  So I begin a new design around this bamboo skewer concept.  Here were the requirements:
  1. Must hold all of our knives including the sharpener and our food scissors
  2. Have a separate section for our matching steak knifes
  3. Have a low profile to minimize occupied counter space
Here's the design I came up with:


It's a pretty simple design.  Some of the angles where a challenge to cut.  This was also the first project where I glued up boards to get those wide panels rather than using plywood.  I ended up using poplar and dying it similar to the TV cabinet.

Here's how it turned out:


This ended up being a birthday present for my wife.  She loved it.  We've been using it for about six months now and it's worked great.  The one slight annoyance with it is that the skewers often come out with the knife.  In the video Marc actually glues the skewers down which would solve the problem.  I didn't end up doing that because I liked the idea of being able to replace skewers easily down the road.  So I'm still trying to find a solutions where the skewers would stay in place but could be replaced if needed.


Toddler Coat Rack

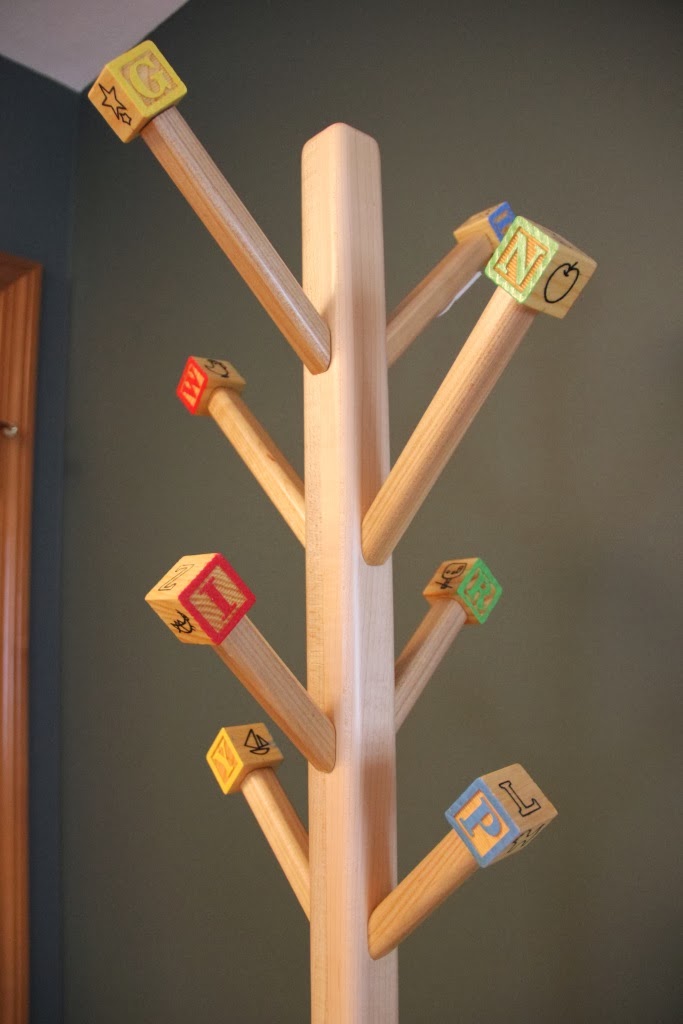
The first project I tackled after the TV cabinet was a toddler coat rack:


The idea for this project came out of a much simpler idea for trying to mount a baby monitor.  Our daughter was just born and we were trying to set up one of the popular baby accessories these days, a video monitor.  We couldn't find a place to mount the monitor that would get a full shot of the crib.  Finally I said I'll just build a simple pole with a base and we can mount the camera at the top.  As I thought more about the idea I was thinking it would be nice if I could turn this into something more than just a pole, something we might be able to use after we stop using the monitor.  That's when I thought of a coat rack.

Now I'm certainly not an expert with coat racks but from experience there were two issues I wanted to try to prevent as best as possible:

  1. Coats/clothes failing off of the coat rack pegs
  2. The entire coat rack falling over from too much weight on the pegs
The latter is obviously a safety concern with a little one running around, and by far the more important issue.  So to try to prevent this, there were three features I built into the design.  First, I made the base very wide, roughly a 15" square.  Next, I made the pegs short so they wouldn't extend out past the base.  Finally, I made the base heavy.  The base is made up of three layers of 3/4" plywood with solid maple trim.  In addition however, is this:


This 10 lb. barbell plate is embedded in the middle of the base.  This was a perfect way to increase the weight.  It's much heavier than the wood but it also conveniently has a nice hole through the center.  I was able to mount the post deep into the base, going right through the center of the weight.  I specifically chose a plate with a 2" hole for that reason, it was a bit more expensive but worth it.  Once the base was glued together the weight was completely hidden.


Now, to try to minimize clothes failing off of the pegs I wanted to avoid having the pegs come out exactly 90 degrees from the post.  In my experience clothes fall off easily when the peg is completely horizontal.  Getting these pegs right was the hardest challenge of this project.  

Using round dowels initially seemed like the obvious choice but drilling a half-inch hole on an angle resulted in a messy hole that was always bigger than the dowel.  

Then I tried to get fancy.  

I tried to steam bend the dowels.  The idea was, if I could bend the dowels I'd be able to drill a straight hole into the post but still have the peg end up at an angle.  It seemed like a pretty clever idea, and I'm sure there's experienced wood workers that would have no problem doing this.  For me, however, no matter what I tried I could not bend those dowels without breaking them.

Finally I found my solution.  It was a simpler concept and I could do it using the tools I had.  I purchased 3/4" square dowels.  I drilled holes in the ends of them and used 3/8" dowel pins to connect them to post.  This solved all of my problems.  I still had the messy hole problem but now, because the square dowel was bigger than the actual hole, any imperfections would be covered up.  Square dowels were key because they're easily to clamp, which made it possible to drill holes in the dowel ends.  Clamping a round dowel is very difficult.  Looking back on it now, square dowels seem obvious if for no other reason then they match the rest of the design.


The last little touch was to use alphabet blocks as the peg ends.  Walmart had an inexpensive set that was perfect for this.  I used dowel pins again to attach the blocks to the pegs.  I purposely did not glue them together though so that they could be replaced if we eventually move this out of the nursery.


So I'll end with just a few more pictures of the coat rack.  This project turned out to be bigger than my original, simple idea, of just a post for a monitor but it's been a great addition to our daughter's room.


Toddler-level pegs

Getting Back Into It

Hard to believe it's been well over a year since I last posted, time files as they say.  The TV cabinet has been holding up great.  It's been such an improvement over the previous stand. There's a few things I might one day try to improve, but for now we're really happy with it.

Over the past year there have been a few small projects that, unfortunately, I didn't document nearly as well as the TV cabinet.  So the next few posts will be about those smaller projects to catch us up to today.  I've got a fairly big project coming up so I wanted to make sure to get back into documenting the process before I really start working on it.

I'm hoping to get a bunch of posts done today so stay tuned.

Wednesday, May 30, 2012

Finished!

Finally Done.  I finished setting it up on Monday, it took several hours to put in all of the electronics, to do the wiring and, of course, to take a bunch of pictures.  Let's start with the before:

The previous set up.
The old entertainment unit.
And here we see the wiring problem.
More wiring.
Not pretty.
OK, now that we got that out of the way, let's look at the finished cabinet:

Here it is, still in the basement
View from the back with the removable back in place
The top.  It took four coats of polyurethane to get it right
Some of the smaller details:

Removable back with UHMW tape
I was looking for a solution for the removable back so it would slide smoothly in the grooves.  I was expecting to find some sort of wax but I found UHMW tape instead.  It works well.  The only downside was the tape was thicker than I expected so it was tough to apply evenly.  Also the back fits very snug, but it does slide smoothly and doesn't bind up at all which is what I was really looking for.

Powerstrips hidden behind the drawer.

Rear fan for the HTPC


Left Side: HTPC, Cable box & Network Switch
Right Side:  Wii, XBox 360, PS3

Onto the wiring.  As I said this took awhile.  I used a combination of cable ties with cable tie mounts and good ol' electrical tape for the thin speaker wires.

Finally, organized wiring.
The removable back in place, minimal wires exposed.

And lastly, the finished cabinet, all wired up and in place:


Hard to believe I started this project more than 8 months ago.  It took way longer than I thought it would but I'm really happy with the results and it was great learning experience.  Time to sit back and watch some TV.

Saturday, May 26, 2012

HTPC "Case" Mod

The final piece to the cabinet is the Home Theater PC.  In our current set up we a have PC hooked up to our TV, so there definitely needed to be a place for that in the new cabinet.  I decided that, with all of the venting I put into the cabinet, instead of just throwing the PC on shelf, why not consider the cabinet to be the case and mount the components directly on one of the shelves?

So I modified one of the shelves.  First, I added a raised platform for the motherboard.  This platform sits about an inch off the shelf.  The reason for the raised platform is so that I could run all of the PC wiring under the motherboard instead of on top for a cleaner look and better air flow.

Shelf with raised platform
Raised platform from the side

I mounted the motherboard standoffs right to the wood platform.  I drilled a slightly smaller hole than the standoff and screwed them in.  They fit pretty snug, hopefully they'll hold.

Then, I mapped out where all of the components would go, again using Google SketchUp.  I actually used a couple of old Steel Tec sets (these came in really handy) to mount the components to the shelf and make a small rack for the hard drives.

All components installed

View form the top
Lastly, I wanted to put a face on the front that would hide the components and tie into the cabinet.  I made the face with some of the 1/4" plywood I used for the back and dyed it to match the cabinet.  I had an old Dell case lying around, which just so happened to have a great front panel that I could incorporate into the face.  It was the exact shape of a hole you could make with a router so I measured and cut the hole in the face and it turned out to fit perfectly. 

I also thought it'd be cool to disguise the DVD drive and make it look seamless.  I wasn't sure if it would actually work but I thought it was worth a shot.  I cut another hole in the face then took a separate piece of plywood for the DVD drawer and rounded the sides manually using a Dremel tool.  Finally, because I couldn't think of a better way, I super-glued the drawer piece to the DVD drawer.  It came out better than I expected. 

Front panel and DVD drawer

The HTPC case mod is complete.  As for the rest of the cabinent, I have finished varnishing and everything is assembled.  All that's left is to bring it up from the basement and wire in the components.  The plan is to do that on Monday and then finally be done.  Stay tuned for the unveiling!


Tuesday, April 17, 2012

Mounting the Cabinet Doors

Over the weekend I knocked out a lot of the little stuff left on my To Do list.  The biggest tasks were creating the drawer face and mounting the cabinet doors to the cabinet.


I chose to use euro style hinges because I like the clean look of not seeing the hardware from the outside.  Also the doors can overlay the frame completely when closed.  Installing them took several hours but actually wasn't that difficult.  I spent a lot of time making sure everything lined up correctly.  My biggest fear was accidentally drilling straight through the doors and ruining the face.

Cutting the drawer face was pretty simple, just a rectangle.  Home Depot didn't carry solid maple that wide so I had to use some plywood which meant more edge banding.  Not a big deal though, it came out pretty good.  What's crazy is that I *think* the drawer face was actually the last thing I had to cut.  From here on out its just some gluing, drilling, a little bit more dyeing and then a whole lot of varnishing.