Tuesday, July 22, 2014

Toddler Bed - Cut Outs

Overall using the templates worked out well.  I found it was best to go slow especially around the corners.  It took three passes with the router to do a whole the cut.  Here's a few set up picts:

Headboard top edge
Headboard window
Here's the end results:
Finished headboard

Ladder

Front Wall

Everything was going pretty well until the second to last hole to cut.  Then this happened:

Router slipped off template on the first cut

I was so bummed.  I really felt like the router was riding on the template then I felt it slip back and actually hit the template.  I knew I had made a big mistake.  So next post will be about trying to fix this mistake....


Wednesday, July 16, 2014

Toddler Bed - Templates

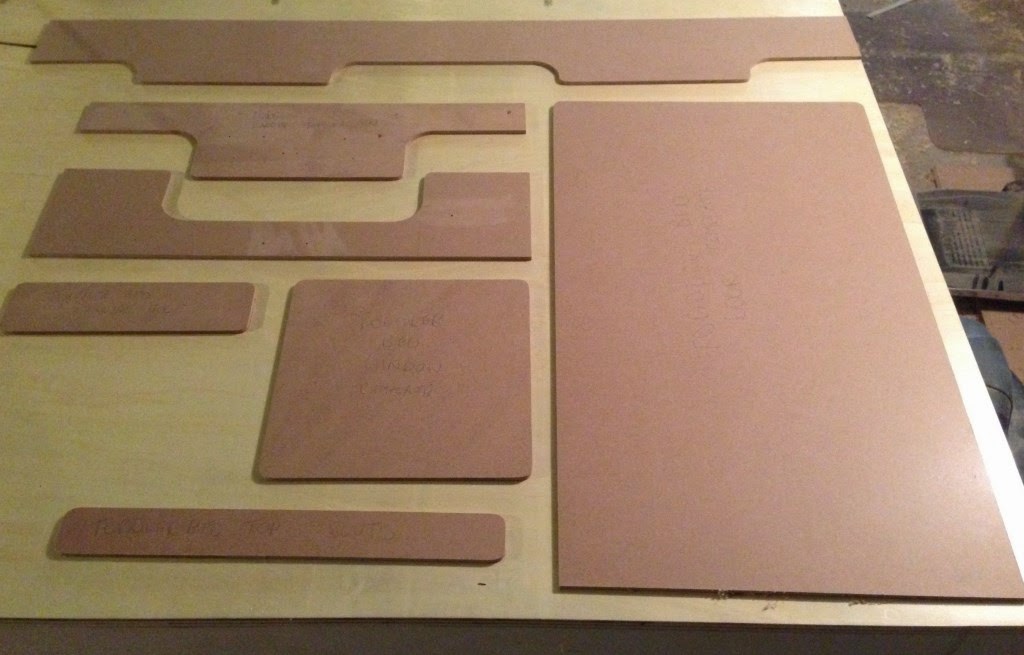
The first step in making the toddler bed is to build some templates for all of those rounded corners and cut-outs.


I chose to use 1/4" thick MDF for the template material because it's relatively cheap and easy to work with.  The router setup is a 1/4" spiral router bit with a 3/4" template guide.


Template guide protrudes about an 1/8" from the router base
This is important because it means the template edge will be exactly 1/2" away from the true cutting edge so the templates need to be sized slightly differently than the corresponding hole.


In all cases I chose to make the templates based on the off cut rather than the keeper piece.  The main reason for this was clamping.  Having to clamp templates in place would be a challenging task.  Often times it's difficult to clamp the piece in such a way that the router won't hit the clamps.  When you can't guarantee that, you have to do a partial cut, then re-clamp, then finish which takes considerably more time.  By creating a template based on the off cut I could take advantage of screwing the template right to the wood with counter-sunk screws and not worry about having to re-clamp (or ugly screw holes in my keeper piece).

Here's my first test with the ladder hole template:


The pieces around the hold only serve to keep the router level, I did not use them against the template guide.  I clamped them where I could but otherwise relied on double sided or blue tape to hold them roughly in place.

First pass - notice the cut is offset from the template
Finished cut with the template removed
When figuring out the dimensions of the top edge templates I had to think it through closely before I got it correct.  For all of the holes it was relatively easy, just subtract 1/2" from every side and 1/2" from the radius of the rounded corner.  However for the top edging there's pairs of opposite curves.  I made a quick model in SketchUp to get it clear in my head.


Since there will always be exactly 1/2" between the template and the finished edge the convex curves actually have a radius 1/2" larger while the concave curves 1/2" smaller.  Once I had that figured out I went and created all of my templates.


Next will be cutting out all of these holes for real.


Friday, July 11, 2014

Toddler Bed - Design

The next project in the list was supposed to be the pantry organizer.  However, with the outfeed table taking as long as it did, and our toddler's growing desire for a "big girl bed" I decided to switch the order of the projects and work on the toddler bed first.

When I did the post awhile back I had an initial design for the bed.


It's a pretty traditional design, nothing too fancy.  Then I stumbled upon this project and it immediately changed my mind on the design.  I love the modern look with the round corners and (most importantly) it looked like a ton of fun for a toddler.   So I went back to SketchUp and came up with version two:


I'm much happier with this design.  I love the lofted idea, our daughter is already trying to climb into her crib at bedtime.  Also I'm excited to make something that just looks like a lot more fun.

This will be made out of maple plywood with four solid hard maple posts.  Being that it's plywood all of those cut-outs are going to expose the manufactured edge.  Originally I wasn't really happy about that.  I thought of using the same iron-on edge-banding that I used with the TV cabinet but for safety reasons it was more important that I be able to round over all of the edges.  While it technically would be possible to create thick edge-banding which could still be rounded over, I felt it would add a considerable amount of time on to the build.  So I've decided it's not the worst thing.

There will be a couple of challenges with this build.  First off all of the rounded corners are going to take a little more work.  I'll be trying to create templates then using a router with a template guide to accomplish these cuts.  Also this is my first attempt at knockdown furniture so it should be interesting figuring out how to hold everything together with nuts and bolts and trying to hide them as best as possible.

First thing will be trying to make the templates and testing out the router guides.

Wednesday, July 9, 2014

Outfeed Table - Wrap Up

Finally getting around to posting the final pictures of the outfeed table. As always things take a lot longer than I expected and I ended up making a few modifications to the original design. I had originally planned to do a split wing.  As the project was dragged on I realized I didn't really need it a single wing would be enough. The other change I made was with the hinges on the wing. I originally didn't want to have the hinges exposed on the top of the table.  I was concerned that the screws would mar the wood as it slid over. However I really liked the idea of a wing that could fold the complete 180 degrees and rest on the table. I couldn't really find any hinges that could do that and mount from the bottom. Here's what I decided on:
Lee Valley Narrow Flip-Top Hinge
The next thing I did was to cut out the wing and start installing them.  I used a combination of a router and a chisel to carve out the recess for the hinge:

Hinge Recess
Test Fit
After carving out the recesses in the wing the next step was lining up the three opposite recesses on the table.  My first thought was to just use a tape measure and measure it out but this seemed like it would be really hard to get exact.  Then my lovely wife came up with the perfect solution.  I put the wing on top of the table as it would sit when it was fully flipped and clamped it to the table.  Then I used a chisel to mark where the recesses lined up on the table.

Wing laying upside down on the table

Marking the table with a chisel using the wing recess as a guide
Once the marks were made I cut the remaining recesses and everything lined up perfectly.

Next was to actually screw them in and this was where I ran into trouble.  The recommended screws I had didn't entirely fit flush in the hinge so I tried using a smaller size.  Unfortunately they weren't strong enough to support the wing and I broke a few of the heads off with the screw stuck in the wood.  Big problems.  Thankfully this little tool helped me out:

Screw Extractor
This cuts a circle around the screw that you later replace by gluing in a dowel.

Hole left behind from screw extractor

The broken screw

Dowel replacing the hole, ready for a second try

After switching back to recommended screws I finished the wing install:

Hinges completely installed
Wing supports on the bottom made of MDF

The rest now was just finishing touches:

Added self leveling feet 
Blade guard cut-out
Miter slot cut in the wing
Sanded and varnished top
Honestly, when I finished the table I wasn't 100% happy with it.  I think the wing was a cool idea but it turned out to be a lot of trouble.  Looking back on it if I could have thought of way of giving me the space to attach and remove the blade guard without having a moving piece of the table I would have opted for that instead. However, even though it's not perfect it's been very helpful already.  I've cut several large boards and it's been a huge relief not having to try to support the board as I'm running it through the saw.  One secondary benefit has just been the large working surface.  It really helps to layout long boards and sheet goods.

So that wraps up the outfeed table, onto the next project...