Tuesday, July 22, 2014

Toddler Bed - Cut Outs

Overall using the templates worked out well.  I found it was best to go slow especially around the corners.  It took three passes with the router to do a whole the cut.  Here's a few set up picts:

Headboard top edge
Headboard window
Here's the end results:
Finished headboard

Ladder

Front Wall

Everything was going pretty well until the second to last hole to cut.  Then this happened:

Router slipped off template on the first cut

I was so bummed.  I really felt like the router was riding on the template then I felt it slip back and actually hit the template.  I knew I had made a big mistake.  So next post will be about trying to fix this mistake....


Wednesday, July 16, 2014

Toddler Bed - Templates

The first step in making the toddler bed is to build some templates for all of those rounded corners and cut-outs.


I chose to use 1/4" thick MDF for the template material because it's relatively cheap and easy to work with.  The router setup is a 1/4" spiral router bit with a 3/4" template guide.


Template guide protrudes about an 1/8" from the router base
This is important because it means the template edge will be exactly 1/2" away from the true cutting edge so the templates need to be sized slightly differently than the corresponding hole.


In all cases I chose to make the templates based on the off cut rather than the keeper piece.  The main reason for this was clamping.  Having to clamp templates in place would be a challenging task.  Often times it's difficult to clamp the piece in such a way that the router won't hit the clamps.  When you can't guarantee that, you have to do a partial cut, then re-clamp, then finish which takes considerably more time.  By creating a template based on the off cut I could take advantage of screwing the template right to the wood with counter-sunk screws and not worry about having to re-clamp (or ugly screw holes in my keeper piece).

Here's my first test with the ladder hole template:


The pieces around the hold only serve to keep the router level, I did not use them against the template guide.  I clamped them where I could but otherwise relied on double sided or blue tape to hold them roughly in place.

First pass - notice the cut is offset from the template
Finished cut with the template removed
When figuring out the dimensions of the top edge templates I had to think it through closely before I got it correct.  For all of the holes it was relatively easy, just subtract 1/2" from every side and 1/2" from the radius of the rounded corner.  However for the top edging there's pairs of opposite curves.  I made a quick model in SketchUp to get it clear in my head.


Since there will always be exactly 1/2" between the template and the finished edge the convex curves actually have a radius 1/2" larger while the concave curves 1/2" smaller.  Once I had that figured out I went and created all of my templates.


Next will be cutting out all of these holes for real.


Friday, July 11, 2014

Toddler Bed - Design

The next project in the list was supposed to be the pantry organizer.  However, with the outfeed table taking as long as it did, and our toddler's growing desire for a "big girl bed" I decided to switch the order of the projects and work on the toddler bed first.

When I did the post awhile back I had an initial design for the bed.


It's a pretty traditional design, nothing too fancy.  Then I stumbled upon this project and it immediately changed my mind on the design.  I love the modern look with the round corners and (most importantly) it looked like a ton of fun for a toddler.   So I went back to SketchUp and came up with version two:


I'm much happier with this design.  I love the lofted idea, our daughter is already trying to climb into her crib at bedtime.  Also I'm excited to make something that just looks like a lot more fun.

This will be made out of maple plywood with four solid hard maple posts.  Being that it's plywood all of those cut-outs are going to expose the manufactured edge.  Originally I wasn't really happy about that.  I thought of using the same iron-on edge-banding that I used with the TV cabinet but for safety reasons it was more important that I be able to round over all of the edges.  While it technically would be possible to create thick edge-banding which could still be rounded over, I felt it would add a considerable amount of time on to the build.  So I've decided it's not the worst thing.

There will be a couple of challenges with this build.  First off all of the rounded corners are going to take a little more work.  I'll be trying to create templates then using a router with a template guide to accomplish these cuts.  Also this is my first attempt at knockdown furniture so it should be interesting figuring out how to hold everything together with nuts and bolts and trying to hide them as best as possible.

First thing will be trying to make the templates and testing out the router guides.

Wednesday, July 9, 2014

Outfeed Table - Wrap Up

Finally getting around to posting the final pictures of the outfeed table. As always things take a lot longer than I expected and I ended up making a few modifications to the original design. I had originally planned to do a split wing.  As the project was dragged on I realized I didn't really need it a single wing would be enough. The other change I made was with the hinges on the wing. I originally didn't want to have the hinges exposed on the top of the table.  I was concerned that the screws would mar the wood as it slid over. However I really liked the idea of a wing that could fold the complete 180 degrees and rest on the table. I couldn't really find any hinges that could do that and mount from the bottom. Here's what I decided on:
Lee Valley Narrow Flip-Top Hinge
The next thing I did was to cut out the wing and start installing them.  I used a combination of a router and a chisel to carve out the recess for the hinge:

Hinge Recess
Test Fit
After carving out the recesses in the wing the next step was lining up the three opposite recesses on the table.  My first thought was to just use a tape measure and measure it out but this seemed like it would be really hard to get exact.  Then my lovely wife came up with the perfect solution.  I put the wing on top of the table as it would sit when it was fully flipped and clamped it to the table.  Then I used a chisel to mark where the recesses lined up on the table.

Wing laying upside down on the table

Marking the table with a chisel using the wing recess as a guide
Once the marks were made I cut the remaining recesses and everything lined up perfectly.

Next was to actually screw them in and this was where I ran into trouble.  The recommended screws I had didn't entirely fit flush in the hinge so I tried using a smaller size.  Unfortunately they weren't strong enough to support the wing and I broke a few of the heads off with the screw stuck in the wood.  Big problems.  Thankfully this little tool helped me out:

Screw Extractor
This cuts a circle around the screw that you later replace by gluing in a dowel.

Hole left behind from screw extractor

The broken screw

Dowel replacing the hole, ready for a second try

After switching back to recommended screws I finished the wing install:

Hinges completely installed
Wing supports on the bottom made of MDF

The rest now was just finishing touches:

Added self leveling feet 
Blade guard cut-out
Miter slot cut in the wing
Sanded and varnished top
Honestly, when I finished the table I wasn't 100% happy with it.  I think the wing was a cool idea but it turned out to be a lot of trouble.  Looking back on it if I could have thought of way of giving me the space to attach and remove the blade guard without having a moving piece of the table I would have opted for that instead. However, even though it's not perfect it's been very helpful already.  I've cut several large boards and it's been a huge relief not having to try to support the board as I'm running it through the saw.  One secondary benefit has just been the large working surface.  It really helps to layout long boards and sheet goods.

So that wraps up the outfeed table, onto the next project...

Sunday, March 30, 2014

Outfeed Table - Day 2

This morning I sat down to review my SketchUp plan and realized I had made a mistake in the way I had planned my cuts.  On my drawing the length of the long apron sides was six inches too short.  So that was disappointing but not really a big deal. I had some long pine boards lying around so I used those instead.  I guess that's the nice thing about building shop furniture.  Moving on...

With the legs glued up I began to assembly the two short sides of the table frame.


Clamping the side apron and shelf support

Two short sides complete

 Next, I clamped up the long apron sides and shelf supports to the two short sides.

Table frame all clamped up

Then, I encountered an unexpected delay...

Unexpected visit from the toddler safety auditor, she doesn't look impressed.

Once I was finally given the go-ahead I got back to work.  I finished screwing the frame together and placed the table top on to check for fitting.

Table top slightly over-sized, will be flush trimmed later
Lastly, I cut out the midsection supports but have yet to attach them.  One of the benefits to my earlier mistake was that it gave me enough wood to create an outer apron for the table top.  This will make the sides flush with the legs.  It wasn't something necessary I just thought it'd look better so I cut those out too.

So here's what's Left:

  • Attach midsection supports
  • Attach table top
  • Cut out shelf top
  • Attach shelf top
  • Attach outer apron
  • Flush trim table top
  • Cut out extension wing
  • Attach extension wing
  • Attach leveling feet
  • Sand & varnish table top
Overall I'm pretty happy with the work I got done in a weekend.  I wish I could have had everything assembled apart from the extension wing but the remaining tasks are things that I can knock out during the week.

Outfeed Table - Day 1

I started working on the outfeed table today.  The basic design came from another Wood Whisperer video (which in turn came from a project from the New Yankee Workshop).  The idea is to build a simple table out of nothing but plywood.  The legs are made from two strips of plywood joined in an "L."  The table top is a single piece of plywood and the rest are just various supports.  I really liked the simple design especially since I wanted to get the majority done in a single weekend.

I made a few small variations with my design.  Instead of having the table top nest inside the legs as Marc did, I'm choosing to have it sit completely on top.  I like the idea of just a solid sheet on the top surface, less things wood could snag on.  The other thing I'm adding is a split fold down wing, more on that in a bit.

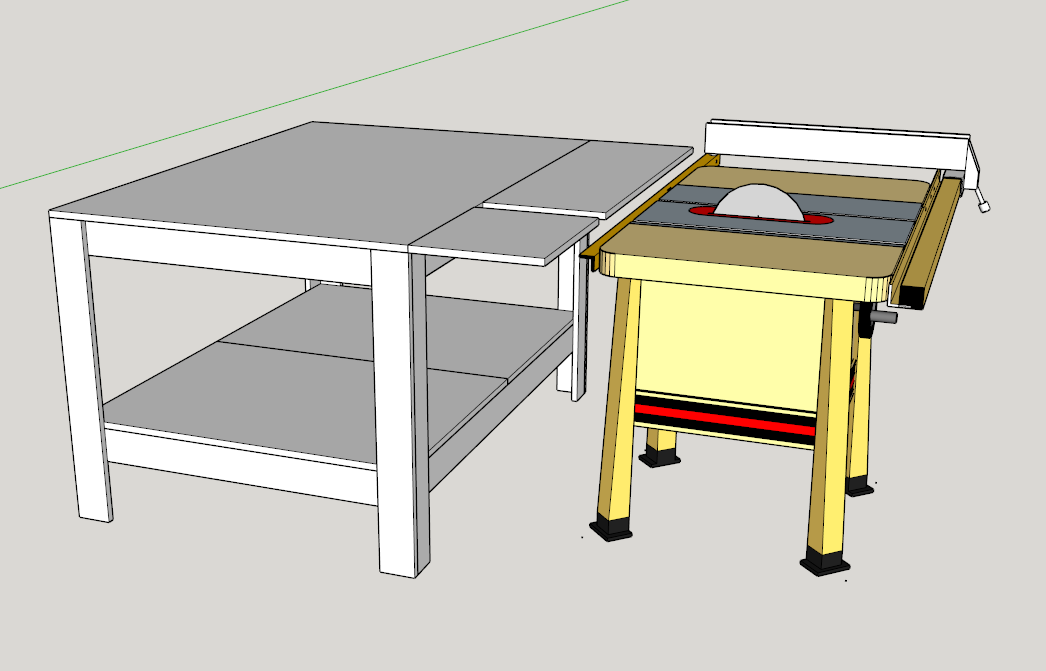
Dimensions of the table will be 60"x 42" not including the wing

Before I began cutting anything I set up a temporary outfeed table by stacking my small work bench on some cinder blocks.

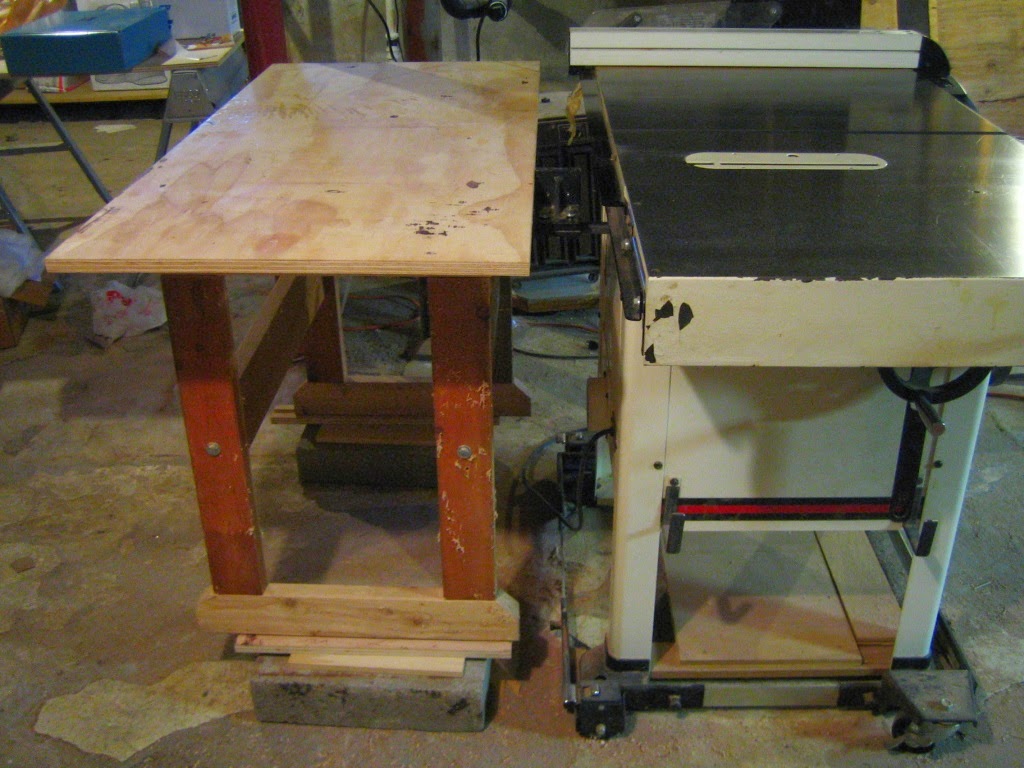
A bit precariously perched
This illustrates an issue with the basic design of the outfeed table.  My table saw has a bracket used to attach the blade guard that sticks out about five inches from the back of table.  So the closest you can fit an outfeed table is five inches away.  That's a pretty big gap.

Blade guard bracket prevents the outfeed table from sitting flush
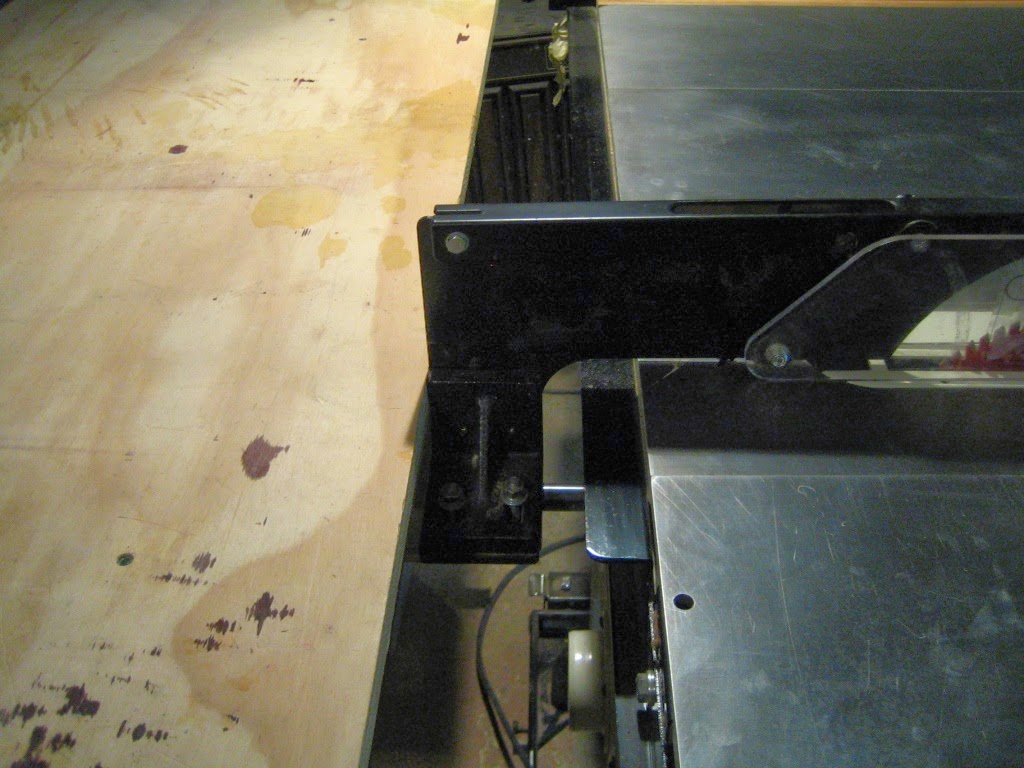
Blade guard installed

So my solution is to build a fold down wing with a cut-out for the blade guard.  Normally table extensions would fold out from the bottom, not down from the top.  However, because of the shape of the bracket, if the wing folded out from the bottom the cut-out would need to be about six inches wide.  A wing folding down from the top needs a cut-out of only about two inches wide.  The only time I would need to raise the wing would be for attaching and removing the blade guard.  I'm still working out exactly how I'm going to do this, finding the right hinge will be key.

Once I had the temporary outfeed table set up I got to work.  I was able to cut out the table top and build all four legs.  The table top was much too cumbersome to try to cut out with the table saw so I cut it on the ground using a circular saw.

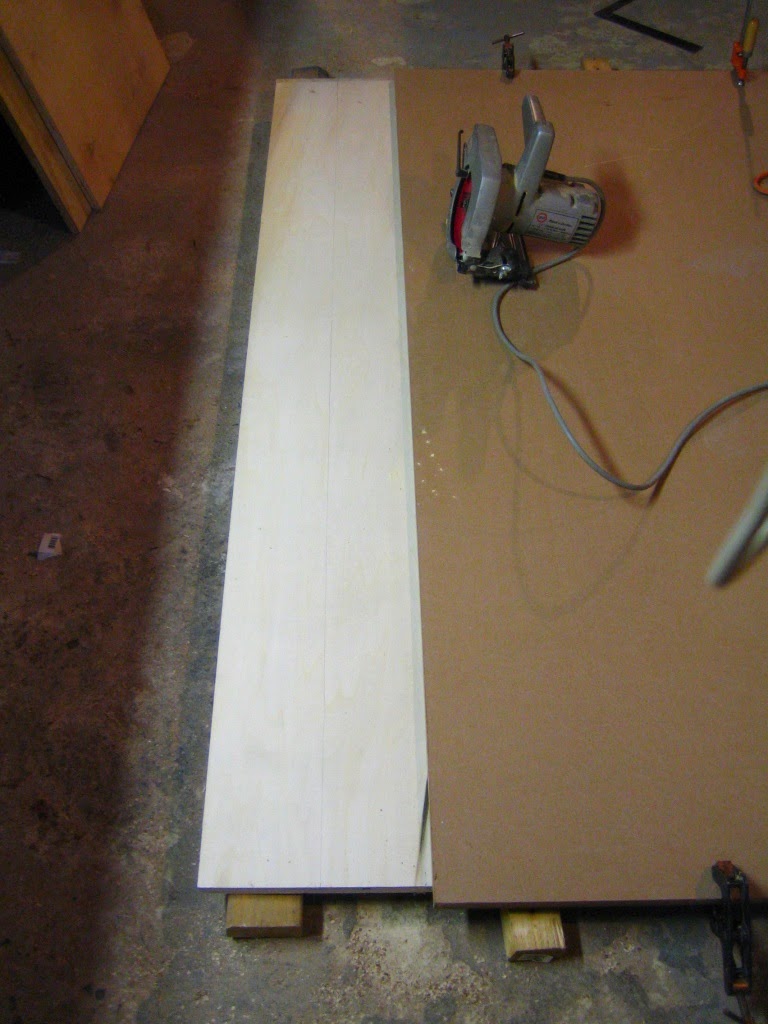
Getting ready to cut out the table top

Big sheet of MDF used for a fence
While I was just planning on using glue and screws for the legs I ended up putting some dowel pins in too.  They made it much easier to line up the boards. I still used screws so that I didn't have to wait for the glue to dry before removing the clamps.

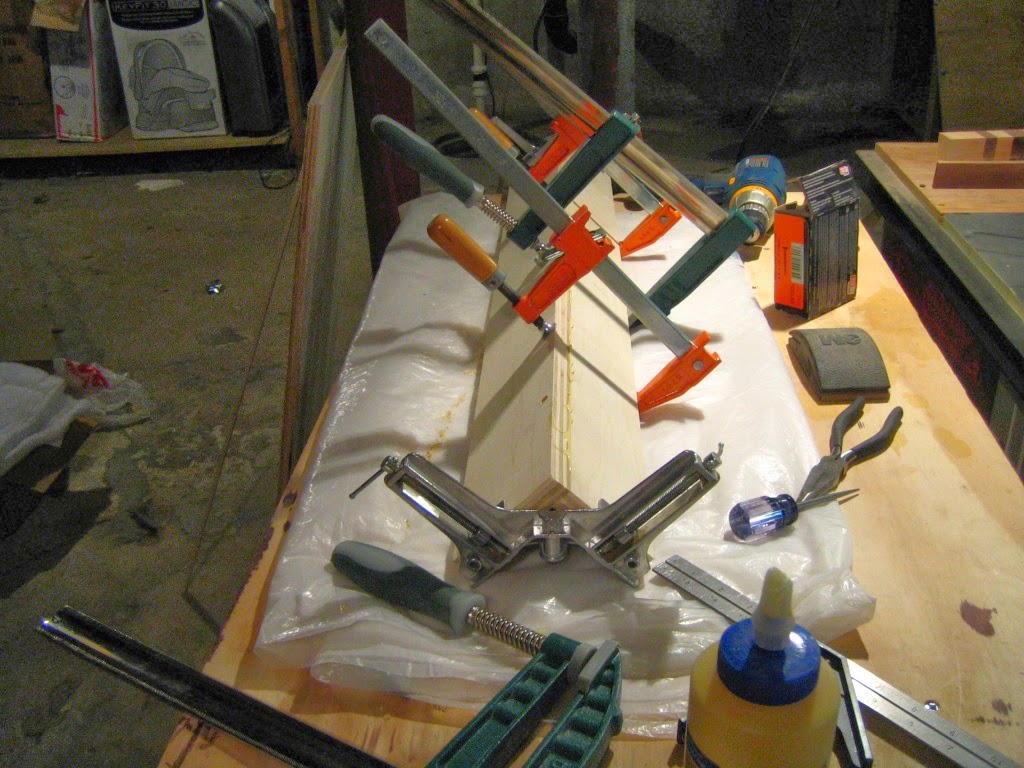
First leg all clamped up then screwed together

Tomorrow I'm hoping to get all of the remaining pieces cut out and to assemble the table frame.


Friday, March 28, 2014

Upcoming Projects

My next projects are all going to be a bit more involved than the last few.  I'm hoping to get back into documenting as I build instead of just a single post at the end.  I actually have three different projects lined up and I'm going to try to overlap the work between them. I realized that when I get to the sanding part of each project I have a tendency to lose patience and rush it (I'm betting this is a fairly common thing with woodworkers).  My hope is that by having another project to build I can sand until I get bored then switch to building a little of the next project then go back to sanding the next day.  We'll see how it works.

So the first project is an outfeed table for my table saw.  After just a little experience with the table saw I already know I need one of these.  Ripping wood and having it start to fall off the table towards the end of the cut is cumbersome and a bit scary.  Here's the initial design:


The goal of this project is to do it quickly.  Since it's just shop furniture I'll be focusing on fast construction and minimal finishing.  I'll probably be using screws and angle brackets instead of nice joinery and I'll probably just finish the top surface.

The next project is a pantry organizer.  We want to replace the shelves in our current pantry with slide out drawers.
Current PantrySliding Drawer Design
In addition to being more convenient this should also almost double the usable space.  I'm hoping to try some dovetails for the drawer walls.

The final project is a toddler bed.  Our two year old is quickly outgrowing her crib and needs somewhere else to sleep.  My first draft is relatively simple, depending on how things go I may actually try to do some inlay work on the head and foot boards.


So the plan is to start this weekend.  I'm hoping I can get the majority of the outfeed table built in one weekend and move on to the other projects from there.